Pages

Wednesday, December 18, 2013

Amazing crockpot meal... especially on these cold days

I am sure everyone sees all the recipes that are shared through Facebook; but, half the time we, including me, fail to do more then just look at the recipes and dream of how good it could be. Well, I am not going to just hit that share button and dream any more. This recipe was one floating around on facebook, and I highly recommend you try it out. There are only a few ingredients and all you have to do is put them in your crockpot and you will have an amazing dinner in 5-6 hrs. The first time I made this recipe my husband I went back for 3rds, yes you read that right, it is that good. Also it makes for excellent leftovers, if there is any left. So try it and let me know what you think.

Ingredients

- 1 bag of frozen tortellini (my bag was 13 oz and I have used tricolored and regular cheese tortellini)
- 2 cans of Italian style diced tomatoes (I have also made it using 2 cans of diced tomatoes with sweet onion as well, both are amazing)
- 1 box or 4 cups of vegetable broth (I use 3 to 3 1/2 cups of chicken broth, we prefer the taste better)
- 1 8 oz block of cream cheese, cubed
- 1 small bag of fresh spinach (I found it best to wait until there is about 2 hours left to cook and add the spinach then, I have noticed if you add it at the beginning it is to wilted for our taste)


1) Add the tortellini, tomatoes, broth, and cubed cream cheese to your crockpot. Stir together if you would like, but no need. (If I am home, I periodically will stir, but once again there is no need)


2) Set your crockpot on low for 5-6 hrs; if you did not add your spinach at the beginning, I would suggest adding it with about 2 hours left.

3) Stir and enjoy


If you would like when it is finished serve with chicken or sausage, both accompany it very well.

Enjoy!


Tuesday, December 17, 2013

Who doesn't love an amazing puffy corn fritter!?!

This is yet another tasty recipe from the collection of Chef Ron Lock, a rising star himself, with a new cookbook and show in the works. I made this recipe for puffy corn fritters for my family to go along with a delicious bacon wrapped chicken stuffed with cream cheese and jalapenos; but you can enjoy them on their own or with another main dish of your choice. Personally think they would pair well with a nice spiral ham; Christmas side dish maybe?! They are super simple to make, so I hope you try them.

Ingredients

- 3 cups of canola or peanut oil (I must confess I used vegetable oil and they were still delicious)
- 1 cup all-purpose flour
- 1 tsp baking powder
- 1 tsp salt
- 1/2 tsp sugar
- 1 egg (I used a large egg)
- 1/2 cup cream or half and half (I used skim milk because that is what I had on hand and it worked well)
- 1 tbsp butter melted (I used salted)
- 1 (15 1/4 oz) can of whole kernel corn, drained


1) Start by heating your oil in a heavy pan to 365 degrees Fahrenheit.

2) In a medium mixing bowl combine your flour, baking powder, salt, and sugar. And in a separate bowl beat together your egg, cream or milk, and melted butter.


3) Now pour your wet mixture into your dry mixture and stir.


4) Drain your can of whole corn kernels and stir into your batter.


5) Your oil should be ready at this point, so you can go ahead and drop spoonfuls of batter into the hot oil. Fry the fritters until golden brown, which does not take long.


6) Once golden brown remove the fritters from the oil and place on paper towels to remove excess oil. They are now ready to serve.


One suggestion was to serve them with maple syrup, which we did try and it was amazing, although it made them slightly dessert like. We also had them plain with dinner, which made them a perfect side dish. 

HAVE FUN AND ENJOY!

Monday, December 16, 2013

Simple, yet irresistible banana bread

I have been making this banana bread recipe for years, which has never failed to be a crowd pleaser. I love how simple it is to make, even my two year old loves to help and I can't forget to mention eat it. I hope you give it a try and have some fun making it and sharing it with the family.

Preheat oven to 350 degrees Fahrenheit

Ingredients

- 4 ripe bananas (it is important to make sure they are ripe, with brown spots, if not it will not turn out)
- 1/3 cup melted butter (that is 5 1/3 tbsp and I used salted)
- 1 cup sugar
- 1 egg (beaten)
- 1 tsp vanilla
- 1 tsp baking soda
- pinch of salt
- 1 1/2 cup flour


1) Peel the bananas and put them in a large mixing bowl, meanwhile melt the butter and pour over the bananas. Mash the bananas and butter together (I use a potato masher). This is my son's favorite part to help with.


2) Add in the sugar, egg (make sure the egg is beaten before adding), vanilla, salt, and baking soda to the banana mixture. Mix well.


3) Add the flour and mix well.


4) You are now ready to add your mixture to a loaf pan, place in the oven, and bake at 350 degrees Fahrenheit for 1 hr.


Depending on your oven it may take less then a hour to bake; I use a convection oven and it takes about 45 minutes. To be sure your banana bread is done test it with a cake tester or toothpick and when it comes out dry your bread is ready.


Allow your bread to cool, then slice and enjoy. My family enjoys this recipe as is, but I urge you to try it with walnuts or chocolate chips, both are amazing!


Enjoy!

Thursday, December 12, 2013

Finally, a coffee cup brownie that's AMAZING!!!

I was browsing my Twitter account (@LauriWert) when I came across this recipe from Chef Ron Lock (@Chef_Ron_Lock) for a coffee cup brownie. I have to admit I was super skeptical at first, because every other coffee cup brownie or cake I have ever tried did not live up to all the hype; but, when I made this one, I wished I had more when it was gone. It is super moist and had amazing flavor, all for only a few minutes of prep and 60-90 seconds of cooking. I recommend you give it a try for yourself.

Ingredients

- 2 tbsp butter, melted (I used salted)
- 2 tbsp water (I used lukewarm)
- 1/4 tsp vanilla extract
- 1 dash of salt
- 4 tbsp granulated sugar
- 2 tbsp unsweetened cocoa powder
- 4 tbsp all-purpose flour

- 12 oz coffee cup (the one I used was a little bigger, so my brownie only filled half of the cup)


1) Add the melted butter, water, vanilla, and dash of salt to the coffee cup; and mix well.


2) Add the cocoa powder and mix well. Then add the sugar and mix well. Lastly, add the flour and mix well. (It is key to mix well between additions)


3) Microwave for 60 to 90 seconds, but be careful not to overcook. The center should be slightly molten.


The final step now is to add ice cream, whipped cream, or powdered sugar on top and dig in. Another way of serving would be to use a 12 oz ramekins; you can serve them after dinner as a little treat for the whole family. I hope you enjoy this recipe, I know my family has.


Enjoy!

Monday, December 9, 2013

Delicious Pancakes... maybe for Christmas morning?!?

After buying boxed pancake mix for countless years, I have decided it's time to search the internet and find an easy yet super delicious recipe for homemade pancakes. During my search I found this recipe (found on hubpages.com) and tested it out on my kids and husband; let me just say one of the first things my husband said is that they were the best pancakes he ever had. They are full of flavor and very fluffy, everyone will come back for seconds and maybe thirds. So here they are step by step.

Preheat your pan or griddle to medium heat (do not use cooking spray or butter on the pan or griddle until you are ready to pour your batter)

Ingredients

- 1 1/2 cups All-Purpose flour
- 3 1/2 tsp baking powder
- 1 tsp salt (this is what makes these pancakes so fluffy)
- 1 tbsp sugar (if you want to use less sugar you can use 1 tsp and they will still be amazing, I have made it both ways)
- 1 1/4 cup milk (I have tested it with skim milk and whole milk, both are great, but I would recommend whole milk)
- 1 egg (I used a large egg)
- 3 tbsp melted butter (I used salted butter)


1) In a medium bowl mix flour, baking powder, salt, and sugar together.  Then make a well in the middle of the dry mix to put the rest of the ingredients.


2) Add the milk, egg (I don't beat mine ahead of time), and melted butter to the well you made.


3) Using a rubber spatula mix the ingredients until just combined. Lumps are not a bad thing.


4) Add your butter or use your cooking spray on your pan or griddle now and then pour your batter onto the preheated surface. I used cooking spray and a griddle, and a 1/4 cup measuring cup to pour the batter. Once your pancakes have formed bubbles uniformly across the tops it is time flip them; after about 1-2 more minutes they will be done.


There you have delicious, golden brown, fluffy pancakes. You will be able to make 7-9 small pancakes with this recipe. Also, I didn't add any thing else to them, but I urge you to try them with chocolate chips, fruit, or any of your other pancake favorites. 

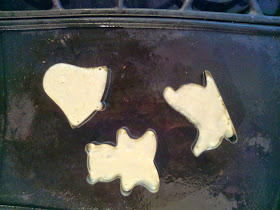
PS: try using cookie cutters to make fun shapes for Christmas morning.

 Spray the cookie cutters around the inside edges with cooking spray before putting them on your griddle. Then add your batter (fill only about 1/3 of the way because they will rise) , once you start to see a few bubbles gently take the cookie cutters off (be careful, they will be hot). Then flip them like normal and enjoy fun shaped pancakes. My kids love them.


Enjoy!


Thursday, December 5, 2013

Amazingly yummy sugar cookies

I was going to wait till the new year to make my first recipe post, but I can't let the holidays pass without sharing my favorite sugar cookie recipe. I know, I know, there are so many sugar cookie recipes out there, but trust me these cookies barely make it off the cooling rack before they are gone. Since they are one of our favorites, I hope they can become one of yours.

Preheat your oven to 350 degrees Fahrenheit

Ingredients:
- 1 cup butter softened (the recipe didn't specify salted or unsalted, but from experience definitely use SALTED)
- 1 1/2 cups sugar
- 1 egg (I use a large egg)
- 1 1/2 tsp vanilla extract
- 1/2 tsp almond extract
- 2 3/4 cups flour
- 1 tsp salt


1) Mix together your softened butter and sugar on medmum speed. I prefer a hand mixer but a stand mixer will work as well.


2) After the butter and sugar are combined add the egg (no need to beat ahead of time), vanilla extract, and the almond extract (in my opinion this is what makes these cookies amazing) and mix till combined.

3) Next mixture flour and salt together in a separate bowl, then add to mixture. Mix together until well combined, but don't worry if your dough looks like it's not forming, like it's a bunch of separate little pieces, it's ok. Just wash your hands and dig in; I've learned that from here on out it's best to just use your hands.


4) Once you have your dough ready you can use a cookie press, formed dough balls, or these awesome Wilton cookie pans shown below (normally every year Target has new Wilton holiday cookie pans with new designs). If using a cookie press DO NOT refrigerator the dough.


5) Bake the cookies at 350 degrees Fahrenheit for about 9-10 minutes (depending on your oven) or until the edges are a golden brown.


And there you have it, amazingly yummy sugar cookies! With this recipe and my pans the yield was about 2 1/2 dozen; depending on what method you use to form the cookies and if you can resist eating the dough you can yield up to about 4 dozen.

ENJOY!!

Monday, December 2, 2013

For a long time now I have been reading everyone else's blogs, Facebook posts, and looking at all their crafty projects on instagram; marveling at every thing they do and wondering what I am good at. I have tried my hand at sewing, making clothes, blankets, etc, but I can never seem to sew in a straight line no matter how hard I try (although my kids do love their crookedly sown blankets). I am definitely not an artist; not with paint, markers, pencils, clay or any thing. I try to stay away from DIY home remodels, table making, installing shelves, any thing along those lines; if you know me: me plus tools (such as saws) equal a trip to the hospital and skin grafts. I think you are probably starting to get the idea. As I sat and thought a little longer, trying to figure out a constant in my every day, some thing I can do to make others happy, care for my family, and use a talent I have I came up with an idea. I love to cook and bake; I love seeing others reactions when they taste some thing delicious and you can see a comfort and happiness on their face and their bodies relax, forgetting all their cares within a bite. Well, I might be dramatizing this a little, but I hope you get the picture. So, this is where this blog comes in; I am making a resolution to cook/bake every day in 2014, making new recipes and some old ones, all while recording it in a blog. I will post my recipes, pictures before/during/after, and whether it was a hit or not. Throughout the year I would like to have recipe suggestions from readers (hoping I have some), maybe a recipe you think may be good but haven't had the time to make. I will also need some testers, so if you are in the area let me know, because I am making you breakfast, lunch, dinner, or dessert. So, follow me and starting January 1st I will start 365 days of cooking.